“What happens when simultaneously gas– and did you press the brake pedal? You take a screenshot.” In reality, it is often not so easy to create a screenshot, that is, a snapshot of the screen. Because there are many different operating systems, each of which has its own process. And with Android smartphones, the procedure can also vary depending on the manufacturer, especially since some cell phones support several independent methods. It’s no wonder, then, that the phrase “how to take a screenshot” has quite a high search volume. You will find the answer to this question in this article, for all major operating systems.
How can I take a screenshot?
Take screenshots – Windows
If you want to take a screenshot in Windows 10, you can of course use one of the countless free programs. However, if you want to settle for Windows’ screenshot capabilities, you need to remember one key combination: Windows+Print. As soon as you execute the key combination, the computer saves a screenshot of all connected screens both to the clipboard and as a PNG file to the file path C:\Users\Username\Images\Screenshots or to C:\ Users > Username > Images > Screenshots. Alternatively, you can just hit the print button. The Windows screenshot is then simply copied to the clipboard, from where it can be retrieved via CTRL+V can be inserted into any image file.
Another convenient option is the Windows “Screen Snip” tool, located in the Notification Assistant menu (bottom right of the taskbar). This basically works like a click on the print button, but you can use it to copy a section of the screen or individual windows directly and you won’t have to edit the screenshot afterwards.
Take screenshots – Mac
also with one macbook Screenshots can be created. The procedure here is even clearer than on a Windows computer. All you have to do is enter the key combination change+Command+3 (Shift is the shift key; up arrow on the left side of the keyboard.) A thumbnail will appear in the corner of the screen. Clickable to edit; alternatively, you can also wait until the Mac screenshot is saved as a PNG file on the desktop.
It’s also possible to take a screenshot of a part of the desktop or a window on a Mac. For the former, all you have to do is press the buttons Shift+Command+4 Hold down and select the desired area with the mouse. You can also move the selection by holding down the space bar while dragging. For a screenshot of the menu, meanwhile, is the keyboard shortcut Shift+Command+4+Spacebar responsible. The process can be canceled by clicking the Esc (Escape) key.
Take screenshots – iPhone
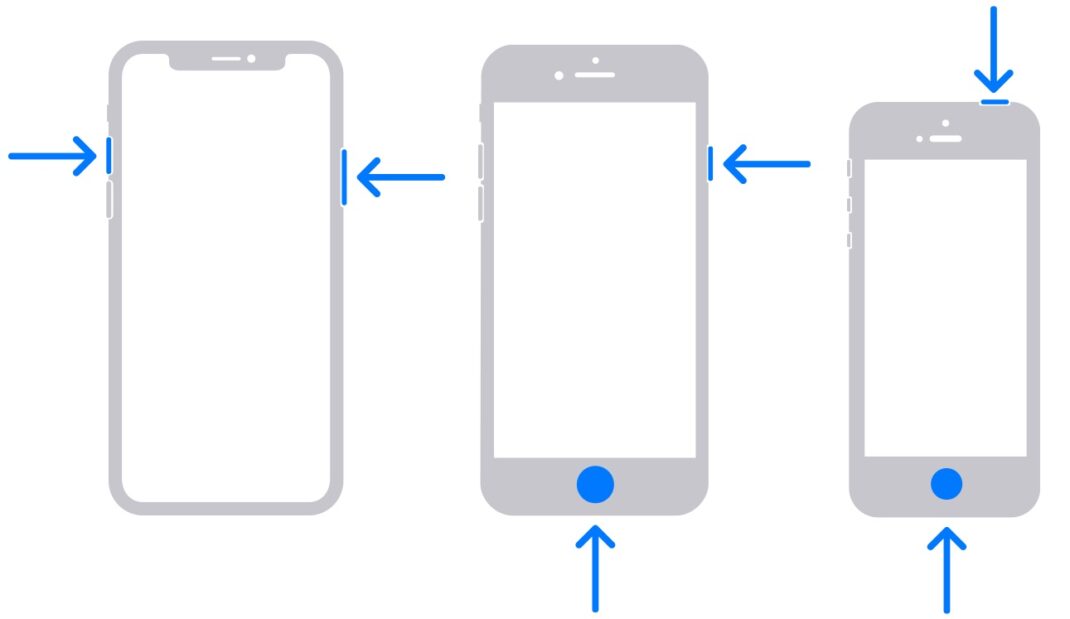
There are mainly three ways to take a screenshot on an iPhone. The reason for the variety is simple: While older iPhones have a home button and buttons in different positions, newer models offer a borderless touchscreen. If you have such an iPhone, you need to press the side button and the volume button at the same time. A thumbnail of your screenshot will appear, which you need to click to open or swipe left to delete.
With previous generations of iPhone, a screenshot can be created by pressing the Side button and the Home button at the same time or by pressing the Top button and the Home button at the same time. Regardless of the procedure, the screenshots taken can be opened in Photos > Albums > Screenshots.
Take screenshots – Android
Taking Android screenshots can be a bit more complicated. Because many manufacturers like Samsung, ZTE, Live, xiaomi and yes too Huawei use the Android operating system. However, many companies rely on their own user interfaces, each with their own screen capture procedures. We have chosen the five most common approaches:
Probably the most common way to take screen recordings with an Android smartphone is this: all you have to do is press the power button and the volume down button at the same time. If this does not work, it is recommended to press the power button until a menu appears. Then select the “Screenshot” option. Another method is to swipe down on the screen with three fingers. And if that doesn’t work either, quickly double-tap the screen with your knuckle. Meanwhile, method five is as simple as it is uninspired: The “Screenshot” tile is often found in Android smartphones’ quick settings (the menu that can be pulled down from the top of the screen).
Depending on the smartphone, if one of the above five approaches works, a thumbnail screenshot or message appears in the notification bar. The screen recording itself can be retrieved in any case in the photos app under Gallery > Screenshots.

Introvert. Beer guru. Communicator. Travel fanatic. Web advocate. Certified alcohol geek. Tv buff. Subtly charming internet aficionado.