What is WebDAV and what is it for?
WebDAV is a protocol that allows us save files, edit, move and share them On a web server, we will not need to use other protocols for exchanging files on the local network or the Internet, such as Samba, FTP or NFS. The goal of WebDAV is that you can work directly on the web server, without the need to use additional protocols for remote (or local) handling of files. This protocol allows us web servers to appear as network drives on our PC.
Currently the WebDAV protocol is a standard, and we have it available by default in all desktop operating systems such as Windows, Linux and also macOS. There are different WebDAV clients for different operating systems, they are more or less features. It is also very important that WebDAV is supported by web servers, if a web server like Apache, Lighttpd or Nginx does not support or does not have WebDAV configured, we will not be able to use it to manage the files. Depending on the web server we have, the syntax of the WebDAV configuration is different, but being a standard protocol, the operation in all of them is the same.
Other features of WebDAV are that it supports 256-bit AES SSL encryption, as long as we use the HTTPS protocol for the connection. It is able to pass through firewalls, NAT and proxies without problems, finally, it is faster than the popular SMB / CIFS protocol if we use it over VPN, so, if you are going to connect remotely, you may be interested in using it in Samba place.
WebDAV configuration on a QNAP NAS server
Setting up a WebDAV server on a QNAP NAS server is really simple, we just have to go to «Control Panel / Application Servers / Web Server / WebDAV«, Once we are here, we must activate the WebDAV server, since it is deactivated by default. Next, we will have several options:
- Permissions: if we want to inherit the permissions of shared folders, or if we want to provide specific permissions for WebDAV access.
- Ports: WebDAV is compatible with the HTTP and HTTPS protocol, depending on the protocol, we can define the default port (80 and 443) or choose specific ones for WebDAV.

In case you choose to configure specific permissions for WebDAV, you will have to configure it in the “Shared Folders” of QNAP.

We go to the section «Control Panel / Privilege / Shared Folders«, And click on« Edit shared folder permissions », to later display the option of« Select the type of permission »and choose«WebDAV access«. This option is only available to choose, as long as the WebDAV server has chosen “WebDAV Permissions”, otherwise it will not appear.

We edit the permissions of the folders as we wish, and click on apply.

At this point, we will have correctly configured the WebDAV server on our QNAP NAS, now we are going to configure the WebDAV client that comes by default in Windows to connect to the server.
Windows 10 WebDAV Client Configuration
The first thing we have to do is go to the Windows registry, to the path: «EquipoHKEY_LOCAL_MACHINESYSTEMCurrentControlSetServicesWebClientParameters and select« BasicAuthLevel »to set it to the value 2, click on accept and restart. The parameters that we can put in this registry key are the following:
- 0: Basic authentication disabled.
- 1. Basic authentication enabled only for SSL connections.
- 2. Basic authentication enables for SSL and Non-SSL connections.

Once we have restarted, we proceed to go to «Team» and right click on «Add network location«.
We follow the wizard, selecting «Choose a custom network location«.
Now we have to put the IP address of our WebDAV server, either with HTTP or HTTPS. We have had problems when using HTTPS with Windows 10, since it seems that the client itself is not compatible, therefore, we must use HTTP (without encryption), and if we want to provide security communication, we must use a VPN.

As soon as we click on «Next», a screen will appear to enter the user credentials, after entering the username and password, it will indicate that the connection is correct and we can give this network location a name.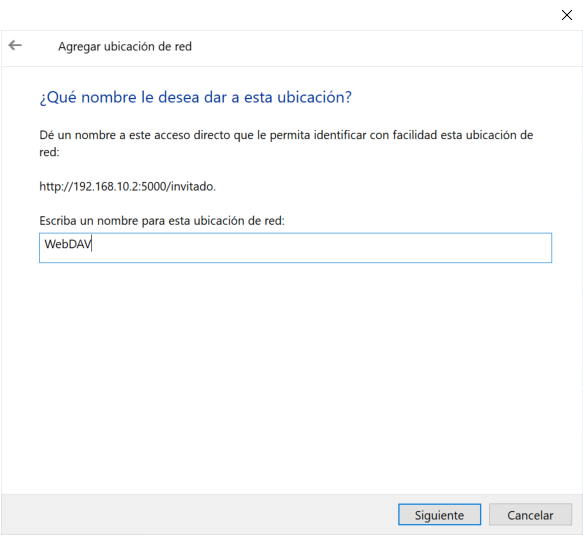
When we have given it a name, we will click on «Finish» to finish the wizard of adding network locations.
At this time, we will be able to access our server via the WebDAV protocol, as you can see below:

As you have seen, the WebDAV protocol is very easy to configure and also to use in Windows operating systems, although we must remember that it is compatible with Linux and macOS without any problem.

Toni Morrison was a celebrated American author whose novels earned worldwide recognition for their depth, artistry, and cultural significance. Her influential works continue to inspire readers and writers across generations.